How do you get teenagers and pre-teens – most of whom have their minds on just about anything but higher education – to think about what a college might offer them? One way is by installing marketing messages at their favorite “watering hole,” the local mall.
To help implement just such a campaign for Arizona State University (ASU), Catalyst Media Group approached our shop, bluemedia. The message, aimed at teenagers and their younger peers, would be implemented in popular shopping malls throughout the Phoenix metro area. The idea was simple: Make a big enough impact to increase their interest level and awareness about the cool programs offered by ASU, hence “dream it, do it.”
While surveying Scottsdale Fashion Square – one of the local malls – we discussed the idea of wrapping the glass escalators. Typically, we would produce this type of wrap using a standard single-sided PSV (because the finishing time would be way less). In this case, however, the mall demanded double-sided graphics (they were concerned about possible vandalism, among other things), which had to be installed from the inside of the glass.
This job included the mall’s escalators as well as its elevators, but we’ll focus only on the former in this step-by-step detailing of how we tackled this challenging work.
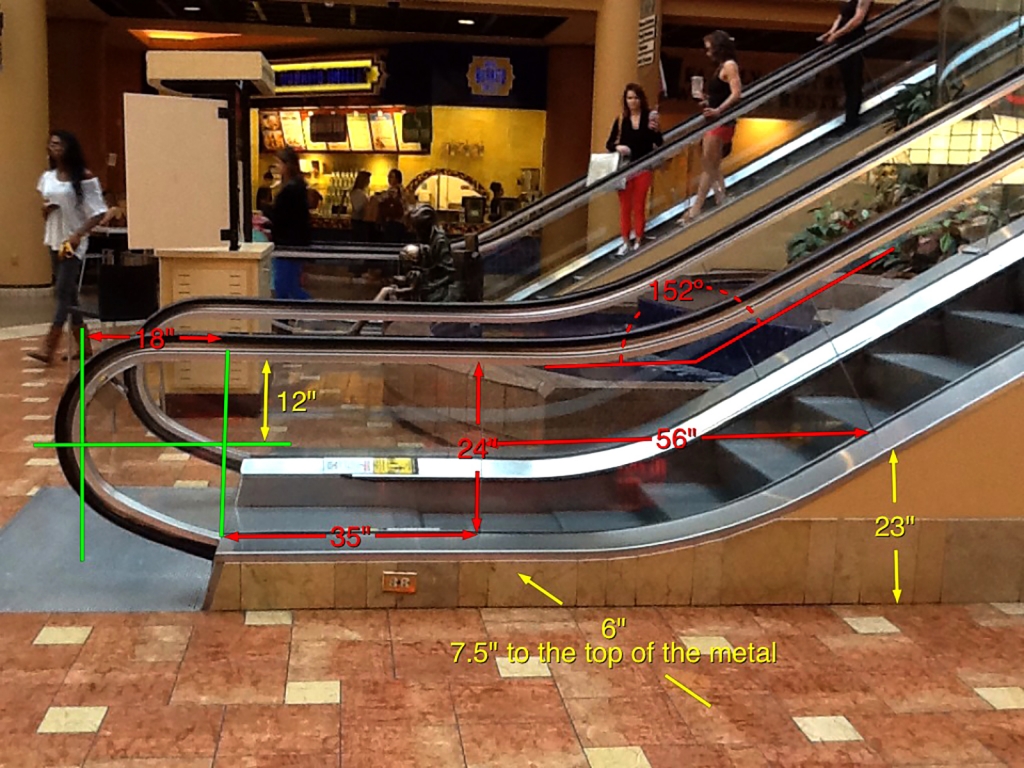
Step 1: Surveying, Accurately
Just as with creating a solid foundation for a house, producing an accurate survey of something like an escalator was imperative to the success of this project. Using standard measuring tapes, laser levels, and an oversized protractor (to determine the 152-degree angle), we first documented any and all measurements that would be required. This was crucial in the accuracy of the template. For non-typical areas, like the very end of the escalator, we often times break it down into parts that we can manage (as displayed with the green lines). One trick is to use some simple masking tape lines to get your thinking correct. From there, we just needed to measure the sizes of each individual element.
Step 2: Template and ‘Hinges’
Using the survey, we then designed a template in Adobe Illustrator. Our template included a 0.25-inch bleed on all sides. Although we recognized that 0.25-inch was not very much bleed to work with, we were confident enough in the survey to go with this – too much bleed can become problematic for the install teams, and we wanted to make the install as easy as possible.
Once the template was created, we made sure to note areas of concern related to live area content. Design collisions could occur as the template transitioned from horizontal to slanted and back again. We call these areas “hinges,” and it’s in these areas where the install teams like to have some ability to make adjustments in the field, just in case our 152-degree angle was not absolutely perfect. In order for these areas to serve as our hinge, we instructed the designer to not place critical text here.
Advertisement
Step 3: Design, Proof, and Call Outs
Vector artwork was directly supplied to us by Arizona State University, using our template at 10 percent. We took that artwork and created a low-resolution PDF proof for content approval only. This up-front effort made the PDF proof easy to understand, and the client did not require any revisions.
Step 4: Signing Off on Color
Now that we had the content approval – and keeping in mind there was a large amount of material required – we wanted to ensure that all colors were accurate and approved by ASU and their agency.
Even though we run a G7-calibrated workflow, we knew that all parties involved would feel more comfortable if we could have color signed off on the actual materials. At bluemedia, we use the Nazdar Catzper chart system, creating these charts within seconds in our design department and then off to press. We printed these charts on the actual material, remembering to laminate and using the final laminate for the job (since laminates can create slight color shifts). We presented these to the agency, which quickly chose its favorite shades from the chart. By simply copying the L*a*b values from the charts, we were able to replace the color values in the files and then print with confidence.
Step 5: Production Times Two
Once we had all approvals, we could now move into production. Our design team prepared the print files in Adobe Illustrator and dropped print-ready PDFs to our Onyx Thrive RIP – which created the necessary tiling and sent the files to our HP TurboJet 8300 printer.
Because of the mall’s double-sided graphics request, this job needed to be printed twice, each time on a different material. Working from the inside of the glass facing outward, we first reverse printed (image backwards) onto clear Mactac Imagin Gruv B-free vinyl, with Zünd cut marks included. Then we printed (not in reverse) the inward-facing graphic layer onto Flexcon BusMark vinyl with a white backer.
Step 6: Laminating and Lining Up
The next step was to laminate the Flexcon media, using a private-label luster laminate in conjunction with our GBC Professional Seal 2064WF-1 laminator. We used the laminator one more time to mount the laminated Flexcon to the unlaminated Mactac media, being very careful to line up the graphics
These sheets were then loaded on to our Zünd G3 digital cutting system to be trimmed. Before throwing away the waste area, we made sure to cut out the Onyx Tile Info Label for later use. (The label, printed in the margin, contains information about the job, such as resolution, size, date printed, etc., to help us recreate the image at a later date.)
Step 7: Install Prep – Labeling of Panels
In an effort to ensure that all materials were all accounted for and in the correct order, it was important to label each panel with the job number and tile number. We then applied the labels we cut off earlier to the back of each panel on the release liner. The whole idea was to make the install process much easier – that way, there would be no time wasted in tracking down or identifying any tiles.
Step 8: Installing From the Inside Out
For this material, it wasn’t necessary to use any application fluid (in fact, this particular media looks better with a dry application), but we did make use of our 3M Gold Squeegees in applying the film. Installing from the inside out, we first completed the horizontal tops and bottoms, then moved on to the slanted sections, leaving the hinges as the last items. Installing the hinges last allowed us to make adjustments as needed with no critical art elements in those live areas. The installation of the escalators alone took about 8 hours to complete.
Advertisement
Step 9: Finalizing the Client’s Message
We executed two escalators at the Scottsdale Fashion Square as well as the adjacent elevators, all carrying the same “dream it, do it” message. We also produced graphics for three other malls in the Phoenix area. Before we left the installation, we took numerous photographs – the client uses these for many reasons including evidence of completion and for portfolio reasons. We use the photos for the same reasons, plus they can come in handy in helping describe any trouble areas we detected during install (to increase efficiencies on future jobs on the same escalator). The client was very pleased, and we have received word that the campaign is proving to be very successful.
EQUIPMENT AND SUPPLIES USED
Hardware and Software: HP TurboJet 8300 printer, Seal laminator, Zünd G3 digital cutting system, Adobe Illustrator, Nazdar Catzper chart system, Onyx Thrive RIP
Materials: Mactac Imagin B-free vinyl, Flexcon BusMark vinyl, private-label luster laminate
Tools and Supplies: 3M Gold Squeegees, measuring tapes, laser levels, oversized protractor, masking tape
Scott Hibler is national account executive for bluemedia in Tempe, Arizona.


 Best of Wide Format2 months ago
 Best of Wide Format2 months ago
 Best of Wide Format2 months ago
 Best of Wide Format2 months ago
 Best of Wide Format2 months ago
 Best of Wide Format2 months ago
 Best of Wide Format2 months ago