If there was any doubt that lenticular can attract the attention of large numbers of people, it was laid to rest last year when Rolling Stone magazine used the technology for both its front and back 1000th issue covers. A dramatic, three-dimensional collage featuring some of the biggest names in music, film, TV, and literature, the lenticular graphics were featured on 2 million copies of the magazine, both subscription and newsstand editions, and generated national attention.
Movie studios, which have always recognized lenticular as a good attention-grabber, also have been utilizing lenticular to great effect. Sony Pictures, for instance, recently produced a lenticular poster for the new Nicholas Cage film, Ghost Rider, which premiered in February. The graphics featured a close facial shot of Cage that transformed into a fiery skull. In addition, Sony’s lenticular movie poster for the upcoming Spider-Man 3 has the chest torso of a red Spider-Man suit morphing into a black-and-white costume of that film’s villain.
Examples of inkjet-produced lenticular are a bit more rare. In fact, despite a growing market in out-of-home and P-O-P printing, only about 3% of the lenticular market (including small- and large-format applications) is currently produced using wide-format inkjet equipment, says Flipsigns’ Thomas Mark, a 37-year veteran of the lenticular industry. The majority of jobs are typically produced using high-speed lithographic presses.When wide-format inkjet is used, it generally is produced in one of two ways:
* By direct-printing in reverse onto the back of the lens with UV ink using a flatbed inkjet printer (currently estimated at 25% of the wide-format inkjet lenticular business). “The companies that are most successful with this are the flatbed printers that have vacuum beds [that] suck the sheet down and the printhead moves over the sheet, as opposed to printers that pull in the material on a set of rollers,” says Jim Owens of Microlens.
* Or by printing on a rollfed wide-format inkjet printer, or a photo imager (such as a Durst Lambda or Oce LightJet), and laminating double-sided adhesive to the back of the lenticular lens and attaching it to the substrate. This requires skill in registering the lenticules of the lens to the lines of the printed file to make sure they line up just right.
Despite their scarcity, we’ve managed to track down five examples of lenticular jobs produced with wide-format equipment. In the case studies that follow, we’ll lay out how each print provider produced the job, hitting on the equipment they used as well as the materials, and software that was needed to create the magic eye-fooling images that are lenticular.
Advertisement
Refining the technique
When department store Fortunoff wanted to revamp its image, it set out on a new advertising campaign that included lenticular window graphics for its 5th Avenue location in Manhattan, which receives high foot traffic. The company called on Refined Sight, a combination design firm and print-production facility in New York City, to produce a two-panel lenticular display of three changing images to promote Fortunoff jewelry.
This was Refined Sight’s first lenticular job, and the initial to-do item on its agenda for this project was to find interlacing software. The company chose HumanEyes software because the product includes two days of training, says company owner Robert Baumeister. “We told HumanEyes, ‘This project is going to help us pay for the software purchase, but we need you guys to help us produce this.’ It’s not like you buy the software, plug it into your computer, and everything turns out perfect.”
This opinion was echoed in no small way by Microlens, from which Refined Sight sourced lenses. “When we set up an account to purchase our lenses…and told him the first project we were doing was going to be an 8 x 8-ft tiled flip, he said were out of our minds,” says Baumeister.
Nonetheless, Refined Sight dove into the lenticular pool head first. It had the HumanEyes training expert help produce the Fortunoff piece during one of the training days, using the HumanEyes software for interlacing the images. Refined Sight then paid for an additional training day to get up to speed on the software.
The shop output the file on its Epson Stylus Pro 9600 with Onyx PosterShop RIP and Epson UltraChrome ink. Using a Seal Image 600 laminator, Baumeister and crew then laminated MacTac’s Permaclear double-sided adhesive to Microlens lenticular lens, which was registered to the print and attached. Next, using a matte knife and straight edge, they trimmed the panels by hand to the final sizes.
Advertisement
For increased rigidity, 1/2-in. black Gatorfoam board was added to the back of each panel before the job left the shop; at the installation site, Refined Sight added two more pieces of black Gatorfoam, this time with Permamount on them to connect the two panels, and again for increased rigidity.
What was the most difficult thing about producing this first lenticular job? “Tiling multiple pieces together,” says Baumeister. “I’d line up the right-hand side-it’d look beautiful. I’d line up the left-hand side-it would look beautiful. [They were both sides of a woman’s face.] But when you’d put them together, they’d look like crap. As you walk past, they have to flip together. And that took a tremendous amount of testing. We’re getting better at it, but it’s very difficult.”
Refined Sight is 13 years old and has 11 employees and a 5000-sq ft facility. It sells design and photographic services as well as print-production services. Its client roster includes P&G, Swatch, Nielsen Media Research, and others. In addition to the Epson 9600, the shop’s equipment comprises a Seiko 64s, two 60-in. HP Designjet 5000s, two Seal Image 600 laminators, and a Summa 60-in. tangential cutter.
REFINED SIGHT
www.refinedsight.com
Building a 3-D experience
Big3D.com specializes in lenticular prints, whether these are produced via wide-format inkjet or lithography, and it was the first beta site for the Microlens inkjet-specific large-format lens. The Fresno,CA-based company opened its doors 10 years ago, and today it employs 25 and features 110,000 sq ft of working space.
Advertisement
“We became the early specialist in large-format lenticular,” says Big3D owner Tom Saville. “And being in an industry that’s had so many people go out of business, just by the fact that we’ve been in business 10 years and we still have the same phone number and website-it makes it easy to grow the business.”
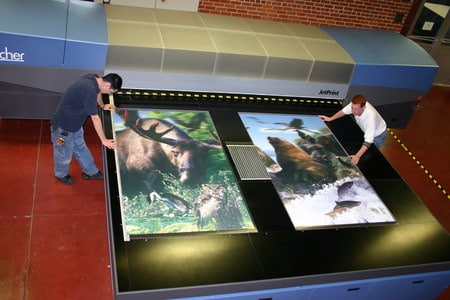
Big3D utilizes a trio of technologies to execute its lenticular work, including: a Luscher JetPrint flatbed, with which it prints directly onto media; a Cymbolic Sciences (now Oce) LightJet 5900RS printer for photographic prints, gluing the lens on top of the output; and KBA and Man Roland presses, for lithographic sheetfed prints.
Recently, the company completed a project for “The BC Experience” in British Columbia’s Crystal Garden Conservation Centre, located on the southern tip of Vancouver Island. A 7 x 50-ft 3-D mural installed in the Centre’s Gallery Promenade Exhibit, the exhibit was designed to showcase all of British Columbia’s local wildlife in photographs for the Centre, which is dedicated to the conservation of exotic plants and endangered animals.
Big3D used its Luscher JetPrint digital flatbed printer with UV inks and Onyx PosterShop RIP to print in reverse directly onto the back of 12 panels of 50 x 96-in. 10-lpi 3-D lenses. Interlacing for the 3-D depth perception was done using 3-D Genius software from Flipsigns; to allow for viewing from different perspectives as viewers passed by the mural, the company used Flipsigns’ SuperFlip! interlacing software to merge the images.
Following printing, Big3D laminated a white polypropylene backing film onto the lenses using its Seal Image 5500 hot laminating machine. It then used its CNC 80 x 144-in. router table with WinCNC front end to trim the lenses to final specification. Total finishing time was 3 hours. The exhibit will be on display for several years.
BIG3D.COM
www.big3d.com
Flowering fine art
Artist Karin Schminke initially worked with wide-format lenticular back in 1999, learning the technique from fellow artist Bonny Lhotka, part of the Digital Atelier digital fine-art team (Dorothy Simpson Krause completes the trio).
“At first there was a big learning curve. It was sort of a side thing I was doing. But what’s happened over this period of time is the technology has evolved so much. Today, it’s a combination of great printers, great programs, and great lenses,” says Schminke.
One of Schminke’s more recent lenticular pieces is Allegro, a 48 x 48-in. depiction of the head of an Allium flower that she actually had no lenticular intentions for when she first produced it. “This was an image I was working on just for my regular fine-art printing,” she says. “And I thought it would make an exciting piece that would really utilize the movement and depth of lenticular really well-so I decided to make it lenticular. That’s when the deconstruction began.”
The source imagery for this piece included three pencil drawings that Schminke drew by hand: one of the white “energy” lines, one of the black “energy” lines, and the stems and flower. She also painted a background for the piece.
Schminke used her Microtek Scanmaker 9800XL large-format scanner with Microtek ScanWizard Pro scanning software to digitize the artwork. She then assembled all the files into a single Photoshop file, which she used to create the original fine-art piece titled, Allium: Allegro, by adding layers and channels.
When she decided to turn the piece into lenticular, Schminke then split that single file into four quarters to make a four-panel lenticular piece, each panel measuring 24 x 24 in. She utilized Flipsigns 3-D Genius lenticular software to interlace the layers in each of the four files.
“So not only did I pull the image apart front-to-back to make it 3-D, but I also split it into four different pieces,” says Schminke. “Each quarter took 45 minutes to interlace.”
For output, Schminke used her Epson Stylus Pro 9600 with ErgoSoft PosterPrint RIP to image onto InteliCoat Polyester Frontlit/Backlit Film at 360 dpi. When it came to lining up the lens to the interlaced image on the print, says Schminke, “I really don’t like having to trim down the lens, so I order the lens to size. Normally with lenticular you have an alignment bar along the edge, but I’ve eliminated that and just use my eye to line things up. Then, I use an X-Acto knife to trim the extra film hanging off the edge. But this technique is something I can do because I’m creating my own vision, my own art. If I were creating lenticulars for someone else, it would be impossible to do it without alignment bars.”
Once the piece was aligned, she turned to her 26-in. Coda CMP26 MS cold laminator, adhering the 20-lpi 3-D Microlens lenticular material (pre-coated with adhesive by the company) to each of the four panels.
This four-panel version of Allegro was on display at the 2006 Andre Schellenberg competition at the SGIA Expo in Las Vegas. Schminke also has created 24- and 36-in. versions of the piece.
KARIN SCHMINKE
www.schminke.com
Fish on a flatbed
For an intriguing aquarium project for its offices around the globe, German-based Schreiner Group turned to Total Graphic Solutions, a print provider in Smyrna, GA.
The job was a 3-D backlit aquarium piece designed with pictures of real fish and coral that would be placed in the backs of aquariums in the worldwide offices of the Schreiner’s various headquarter buildings. And it took anything but a direct route to Smyrna: When Schreiner Group queried a European lenticular plastics provider about the project, that company referred Schreiner to Photo Illusion, the lenticular software provider based in Atlanta. Photo Illusion then turned the job over to Total Graphic Solutions.
“We primarily sell our lenticular software to large-format and litho printers,” says Wahn Raymer, Photo Illusion president. “But if people call and ask me specifically for something, I’ll do it on a personal level. I’ll let them know how much the software costs, and I’ll let them know how much it costs for us to do it for them.”
Photo Illusion received the designed files from Schreiner and converted them into 3-D form using its Power Illusion interlacing software. The software took 17 to 20 layers of Photoshop files and output them as an interlaced TIFF.
“We prepared some anaglyphs (3-D proofs) for Schreiner to view. Once these had been approved, we took them to Total Graphic Solutions and had 10 to 15 of these run.”
Total Graphic Solutions used its Inca Columbia digital flatbed inkjet printer with Wasatch RIP to reverse image onto 36 x 48-in. pieces of 15-lpi 3-D lenticular lens material from Microlens.
“Before with lenticular, you would have maybe 50% waste-because you’d have to hand-align an optical lens to a 48 x 60-in. piece, and if you’re off by 1/20-in., keep going down 60 inches, and you’ve screwed up the piece. With the Inca, however, you can print the alignment pattern right on the bed of the press, align the optical lens, vacuum it down, hit ‘go,’ and the machine never deviates. It always hits dead-on every time with virtually no waste,” says Raymer.
Once the printing was complete, Total Graphic Solutions used its Seal laminator to put a GBC translucent backing material on the back of the lens. Finished graphics were shipped to Europe to be distributed to Schreiner facilities.
In business for 4 years, Total Graphic Solutions has been producing lenticular work for all but the first of those. The company has 12 employees at its 18,000-sq ft facility; its clients include primarily ad agencies and print brokers. In addition to its Inca Columbia and 60-in. Seal laminator, the company owns an Inca Columbia Turbo, a Gandinnovation Jeti, a 65-in. banner sheeting machine, and a Warthog router.
TOTAL GRAPHIC SOLUTIONS
www.tgsatlanta.com
Flipping for Nike
For Nike’s ad agency Wieden + Kennedy, Dynamic Images in Hawthorne, CA, recently produced an out-of-home bus shelter campaign that was installed in multiple cities around the country including New York City (225 pieces), Denver (75 pieces), and Baltimore (80 pieces). The graphics consisted of a lenticular flip image promoting Jordan Melo Nike shoes; one side was a close-up of the shoes, while the other was an image of Denver Nuggets basketball star Carmelo Anthony leaning against himself in different outfits.
Ad agency Wieden + Kennedy designed the images with guidance from Dynamic Images on the best way to optimize the lenticular effect. Once Dynamic received the images, it moved them through its photographic lenticular process, using a 15-lpi lens and a laser cutter to trim off final edges to exact specifications. Dynamic Images took 10 days to produce all 400 pieces for this project, which were installed just in time for the beginning of the Christmas shopping season, in November 2006. The images remained installed for 30 days.
Dynamic Images moved into lenticular when owner Don Metcalf purchased the equipment, software, and patents from Kodak’s Dynamic Imaging division when it exited the marketplace 5 years ago. Since then, the company has used the Kodak patents and method to produce lenticular. This method involves proprietary software that interlaces the image and then writes the file out onto a large-format 30 x 30-in. color film negative, which allows the file to maintain extremely high photographic resolution. This negative then goes into a custom-built optical enlarger that enlarges the image onto Kodak Duratrans. The Duratrans is processed and the lenticular lens is glued using a proprietary gluing system with hand alignment onto the photographic print.
According to Dan Judd, the company’s lenticular marketing manager, a key step to Dynamic Images’ process is the horizontal enlarger, because it keeps the thousands of interlaced horizontal lines straight and allows a 30 x 30-in. horizontal image to be enlarged to 4 x 8 ft. This results in a very tight registration between the print and lens, which aids in image clarity and reduced ghosting between flipped images.
Now in its 22nd year of business, Dynamic Images occupies 70,000 sq ft of space and has 80 employees. It produces retail graphics, out-of-home jobs, and lenticular work for an array of clients including Abercrombie & Fitch, Clinique, and others.
DYNAMIC IMAGES
www.dynamicimages.com
Kacey King is associate editor of The Big Picture.
A lenticular primer
So what is lenticular exactly? It is essentially a printing process that duplicates the optical viewing characteristics that allow people to see in three dimensions. A graphic printed in strips, when lined up with a special lens of PVC or acrylic lenticules to focus people’s views at specific angles on the print, allows an image to appear to be 3-D or moving.
Moving images can be a “flip” image-where one image flips to another image as a person moves past or underneath a graphic; an “animation” that shows something in the graphic moving while everything else stays the same-such as a basketball bouncing up and down; or a “morph,” where a graphic changes from one thing completely into another.
A key tool for producing all of these types of lenticular graphics is interlacing software, which takes the original art files and transforms them into a combined single image (images are ‘woven’ together). Once the interlacing is complete, the image needs to be matched with a specific lenticular lens that matches the type of lenticular job, the viewing distance it will be viewed from, and whether it will be displayed in an inside or outside environment.
When it comes to printing lenticular, there are a few different proven methods including classic photographic processes, lithographic processes, rollfed wide-format inkjet printing processes, and flatbed wide-format inkjet processes. The majority of lenticular jobs are printed on high-speed lithographic presses from such companies such as KBA, Heidelberg, and Komori. Some newer KBA presses can even direct-print lithographic materials up to 81-in. wide using UV ink. The difference is that these are thinner lenses made to go through a lithographic press, not the same ones used for printing on wide-format flatbed presses. And the cost factors are different because the setup for a lithographic press requires a larger run of lenticular lenses to make a job worthwhile.
Some history: Lenticular has been in existence for 150 years or so, and probably came to the attention of most in the US with the introduction of president Eisenhower’s “I Like Ike” lenticular campaign buttons and the ubiquitous toys that came in the bottom of Crackerjack boxes. But wide-format lenticular began creeping onto the scene in the late 1990s when Flipsigns, Microlens, and Encad (now part of Kodak), teamed up to create an integral lenticular production system. Flipsigns designed software that would interlace files specified to the sizes of Microlens lens; Microlens designed lens to fit Encad machines specifically; and Encad gave Flipsigns some free Encad printers to give to people interested in starting up a lenticular printing business. Flipsigns then gave these people the free Encad printers and free Flipsigns Super Flip lenticular software. Some of those early lenticular shops took off and grew into large lenticular production facilities, like Big3D.com; others went by the wayside. Those that did grow have expanded their equipment list from Encad to digital flatbed presses and even lithographic presses.
Tips for Great Lenticular Results
Consider these points in producing any lenticular project:
Mounting the lens to the image: “One of the biggest challenges in lenticular is getting the lens mounted to the image-especially if you’re doing inkjet prints,” says Steven Spiro, owner of LA-based lenticular producer Tracer Imaging (www.tracerimaging.com). “Because what inevitably happens is that you have this big inkjet print that you then need to laminate to the back of the lens with some sort of glue or adhesive, and then you need to register it to the print. And that’s a very difficult process-a lot of people are looking up into mirrors and then looking down.”
“You need to make sure that the lens is perfectly aligned on the print bed. If you’re off just a little bit, then you’ll have a different look on each piece,” agrees Total Graphic Solution’s Charlie Rezac.
Choosing the right media: Registration, however, won’t matter unless the print and the lens stay bonded together, so it’s important to choose the right type of media for lenticular applications. Microlens, manufacturer of lenticular lenses for the digital industry, says something that offers a smooth surface that will bond to the lens easily and securely-like glossy photo media or PETG film-will work best. “Basically, you want something very stable that doesn’t stretch when it gets full of ink, and you want to steer clear of vinyls. These do tend to stretch when they’re laminated, and that’s going to affect the interlaced image,” says Jim Owens of Microlens.
Designing for lenticular applications: Artwork that is to be printed as lenticular needs to be specifically designed for the particular lenticular application being produced-whether it be a morph, animation, flip, or 3-D image.
“Quite frankly I think the most difficult thing about doing lenticular is getting artwork that’s prepared specifically for lenticular,” says Tracer Imaging’s Spiro. “That’s because artwork that’s prepared for non-lenticular applications…does not have the same constraints that we have. The best lenticular jobs are jobs that had great art to start with. And so, when you have great art, everything becomes easier.”
Tom Saville, of Big3D.com, agrees: “The most difficult thing about producing lenticular is coaxing the best result out of each individual art file. Rather than simply printing the files as submitted, we strive to provide the best results possible.”
Owens of Microlens explains: “You can interlace any two TIFF files that are the same size, resolution, color mode-just put them in the interlacing software and in a few seconds or minutes, depending on the size of the image, you can have an interlaced image where you could print it. But creating a good flip image takes a little more time. You like to have something that’s an anchor point between the two images-whether it’s a consistent pose, or background that stays the same.”
Other points: Sources interviewed for this article provided a few other tips as well, including:
* The printer you use needs to be able to print the entire width of the image perpendicular to the printhead. So if you printed a 36 x 40-in. image, it needs to print 36-in. wide and that printhead needs to print each slice of the interlaced image 36-in. wide.
* Print uni-directionally vs. bi-directionally, even if your printer can print bi-directionally. This helps you get the most accurate print possible for lining up with the lens.
* Send only “native resolution” images to your printer for lenticular. Native resolution means a multiple of the resolution of the printer you’re printing on-so if you have a 720-dpi printer you can send it a 360-, 720-, 1440-, or 2880-dpi image.
* When showing customers proofs for lenticular, show them an 8 x 10-in. printed sample using the lens it will be paired with, but show it to them from the proper viewing distance. A lenticular sample that should be viewed from across the room will look pixilated at arm’s length and a customer may think an error has been made.
* Finally, when a customer contacts you to take on a lenticular project, don’t hesitate to ask a lot of questions, including: What is the application going to be? In what environment will it be installed? What is the viewing distance going to be? And, is it an indoor or outdoor application? The answers to these questions will factor into the steps taken, equipment used, and even the type of lenticular produced for a particular application.


 Best of Wide Format2 months ago
 Best of Wide Format2 months ago
 Blue Print3 weeks ago
 Best of Wide Format2 months ago
 Best of Wide Format2 months ago
 Best of Wide Format2 months ago
 Best of Wide Format2 months ago
 Best of Wide Format2 months ago