Press Releases
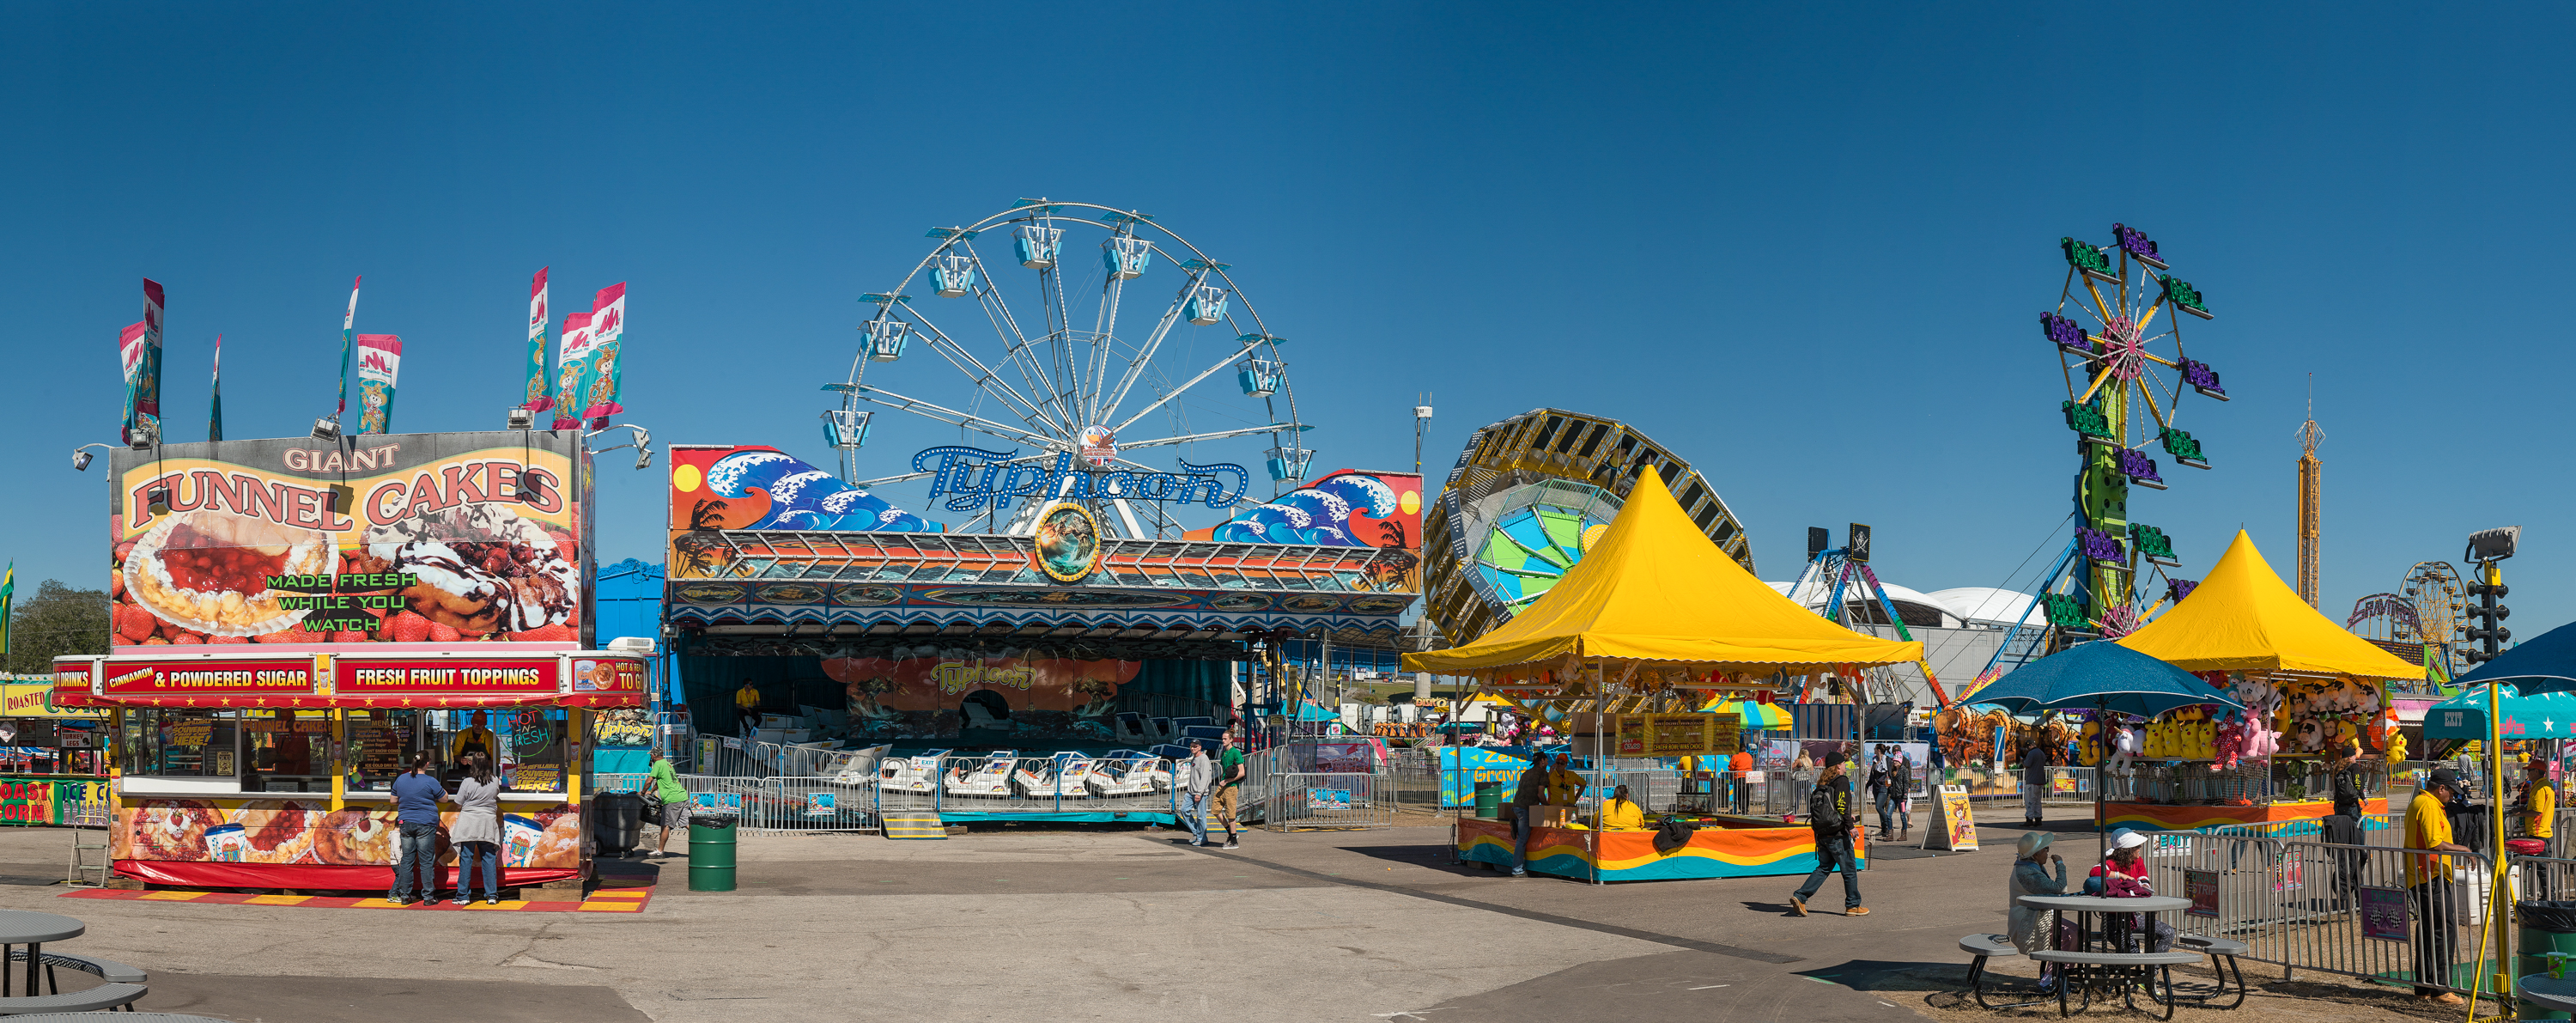
Through the Lens
A large-format photographer offers tips for capturing the best images for digital print.

As a professional photographer, my client requests run the gamut. Some days, I’m called upon to shoot products that will be used in an online catalog. And other days, I’m asked to create images that will span 80 feet long by 20 feet high.
How do I jump from one to the other? How do I ensure the images I create can be used within that vast size range? And what are some simple tips to make this possible?
Honestly, it can be overwhelming trying to decide the settings and sizes that will best capture the image. So, to be on the safe side, I use the largest size I can within my camera. Inevitably, the one time you decide to capture using a smaller option, say for a postcard, the client will ask for a vehicle wrap.
Remember, all printers have specifications for the type of printing they provide. Traditional offset printers prefer images to be 300 dpi at 100 percent of the printed image size. Wide-format printers have a range of resolutions they work with depending on the viewing distance of the final print or installation. Again, they may say they prefer images to be 150 dpi at 100 percent of the printed size (for posters or large photo displays) all the way down to 50 dpi, or lower, at 100 percent of the print size (for vehicle wraps, wall installations, or billboards). It’s important to understand that having just one part of that equation isn’t enough information.
Which leads me to the most important tip I can offer: communication. Asking the client about the single use the image will have and talking directly with the print service provider who will be providing final prints allows me to capture exactly what I need. If I know there’s a possibility that an image will be used larger than traditional printing, I will approach the photography differently. I’ll not only bracket (capture varying exposures of an image), but I’ll also create overlapping images, almost like a panorama, so that I have much more resolution to allow for enlargement. When I know the final output and use, the final size, and the preferred resolution requirements ahead of time, I can be sure to capture everything I need in the beginning.
Large-Format Photography: A Five-Part Process
- Communicate with the client. Ask the client how and where the photos will be used. Try to visit the location, if possible. What’s their vision? Are there any restrictions to size? Are there obstacles?
- Communicate with the printer. Ask the printer to go over the required image specifications. Will they build the final file? What size and type of files do they prefer? Will they provide proofs to the client before printing?
- Create the image. The image needs to meet the client’s needs, but it must also fit within the printer’s specifications. It’s ideal for all three of the players – photographer, client, and printer – to get together to discuss the details of the project.
- Print. My background is in large-format printing and I’ve seen and worked with many types of output devices and media. It’s given me more insight into what my photos will ultimately become. Having an understanding of the printing devices helps because the preparation of the final files may differ depending on the type of output device. This part is just as important as understanding the camera, lens, and software used to create the image, but it’s often overlooked by many photographers.
- Install. If you’ve never witnessed an installation, it’s pretty amazing to watch. This is where all the technical parts come together. Watching how the installers work and put the image together helps me envision the final product when I’m working on the various steps along the way.
Large-Format Photography Quick Tips
- Before even grabbing your camera, ask your client how large your image will need to be and for what type of application.
- Talk to the printer to find out their preferred resolution and file format.
- Create mockups whenever possible so that you, your client, and the printer are all on the same page.
- Be sure to over-shoot so that you have plenty of images to choose from, especially when you’re overlapping to create the largest possible file/image you can.
- Send proofs to the client as soon as possible in case you need to reshoot.
 Billy Elkins (billyelkins.com) is a professional photographer, graphic designer, and instructor. He’s available for consultation and can answer any questions about the large-format photography process. You can reach him at [email protected].
See Elkins' put these tips into action with projects and .
Printvinyl Scored Print Media
New Printvinyl Scored wide-format print media features an easy-to-remove scored liner for creating decals, product stickers, packaging labels, and more. The precision-scored liner, with a 1.25” spacing on a 60” roll, guarantees a seamless and hassle-free removal process.


Check Out the Great Info in the July/August Issue

National Workaholics Day, Interns Day, and More July/August Dates for Print Pros

Kill an Obsolete Project, Survey Competitor’s Websites, and More To-Dos for July/August


Bulletins
Get the most important news and business ideas from Big Picture magazine's news bulletin.


-

 VEHICLE WRAPS + GRAPHICS3 weeks ago
As the Wrap Market Surges, Technology Keeps Improving
-
 Press Releases3 weeks ago
MUTOH Wins 2024 EDP Award “Direct to Shape Printer” for Its XpertJet 1462UF
-
 Case Studies3 weeks ago
At This Pennsylvania Printer, Color Consistency is King
-

 Case Studies1 week ago
Former Frito Lay Delivery Van Becomes an Eye-Catching Catering Vehicle
-

 Benchmarks3 weeks ago
3 Food Truck Wraps Where Skilled Designers Overcame Tough Technical Challenges
-

 Press Releases2 months ago
Avery Dennison Sponsors 2024 Design-a-Bus-Wrap Student Art Contest
-

 Press Releases3 weeks ago
PRINTING United Alliance Announces 2024 Pinnacle Award Winners
-

 Press Releases2 months ago
Konica Minolta’s AccurioJet KM-1e Shines at 2024 In-Print Awards