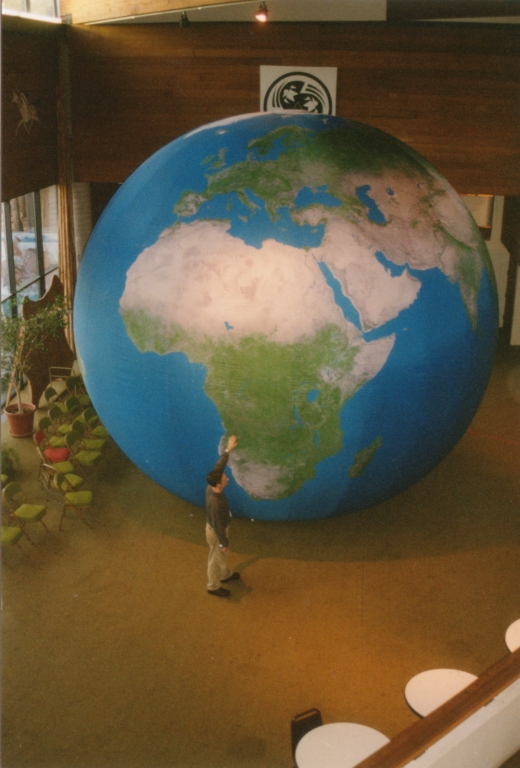
When David Knutson first dreamed up the idea of a portable, inflatable classroom shaped like the Earth, in which children could learn about their world from the inside, out – literally – he spent more than 500 painstaking hours hand-painting the artwork for the 22-foot-tall balloons.
His company has come a long way from those early days in the basement of his home, selling more than 70 balloons to schools and nonprofit organizations since the mid-1990s. The balloons themselves have evolved, too. Today, his Earth Balloons (earthballoon.com) are decidedly more high-tech, trading freehand drawing and painting for NASA satellite imagery. And Knutson has outsourced printing of the balloons to Minneapolis-based Banner Creations. But while the production process has come into the 21st century, it hasn’t become much less time-consuming.
The team at Banner Creations is no stranger to printing on fabric, or even to creating larger-than-life balloons. In addition to other balloon projects for different clients, they’ve worked with Knutson for several years to perfect the Earth Balloon, and in the process have created more than 60 inflatable globes, ranging in size from 19- to 22-feet tall and up to 69-feet in circumference.
It all starts with high-resolution images of planet Earth taken with NASA satellites. Each balloon comprises 24 unique image files, which arrive at Banner Creations manipulated in a “gore” shape – narrow and pointed at the top and bottom and wide in the middle – so they can eventually be stitched together to create a sphere.
“With 24 panels, you get a really round shape,” explains Banner Creations production manager Bob Mahoney. “The fewer panels you have, the less of a circle it’s going to be.”
The level of detail provided by the satellite images makes for a crisp and realistic image of the Earth. “Those start off as really big files, about a gigabyte a piece, and we have to change them all to raster files, which decreases their size to about 25 percent of the original size so we can work with them,” says Mahoney. “Then we have to go back into each of the 24 files and add [in Photoshop] latitude lines for the Equator, the Tropic of Cancer, and the Tropic of Capricorn.”
Advertisement
He builds in a half-inch bleed around every panel for stitching then uses Photoshop to add hash marks “every 12 inches, so that our sewing department can match those up and make sure it’s going to be even.” Once he’s satisfied with the files, Mahoney preps for printing.
“We send the files through our Onyx RIP and then to our 62-inch Mimaki JV4 dye sub printer,” he says. “We use a dye-sublimation process, so we print it in reverse on paper and then we take the paper and put it in with the fabric through our rotary heat-transfer press. It’s a long process and, if you did it constantly, for eight hours a day, all day, it would probably take three days to print the panels for one balloon.”
The panels are printed on a polyester trilobal satin with a special coating on one side to hold in the air when the balloon is inflated.
“All of our fabrics are polyester to receive dye, and we don’t need a laminate or finishing,” Mahoney says. “Once the panels are printed and dry, they go to our sewing department.”
From here, Banner Creations’ on-site seamstress, Nancy Schmaltz, sees the product through to completion. A one-person team, Schmaltz comprises the entire sewing department and, all told, dedicates close to 24 hours of intensive, detail-oriented labor in the creation of each balloon.
Using her trusty double-needle SunStar industrial sewing machine, coupled with a fair amount of hand-stitching, Schmaltz first inserts a zipper, which serves as an entry door to the inflatable classroom. She then pieces the panels together one by one using a sturdy, bonded-nylon thread.
Advertisement
“For each panel, I end up making a quarter inch flat felled seam like the seam on your jeans, and I do that by hand,” she explains. “I do one at a time and go completely around the balloon and then, when I get back around to the zipper, that’s when I do the finished seam using the machine. It’s a lot of work getting the whole balloon under the sewing machine.”
She builds a floor out of vinyl, affixing Velcro around the outer edges so that it can be attached inside the finished balloon, then heat-cuts three circular vents on the top and attaches a hand-sewn blower hose that can be fastened to a standard 65-inch-diameter circular house fan.
“After I get the side seams all done and finished, then I have to put on the polar cap, which is a circle about 18 inches in diameter,” Schmaltz says. “I top-stitch that on so it lays flat.”
The level of accuracy required for each job – from prepress and printing to sewing – is intense and requires great attention to detail by all deparments involved in the creation of a balloon. And it’s not always without error.
“Everything has to be exactly correct,” says Mahoney. “You have to be really careful that the sizes are right. You have to be sure the settings of your RIP are correct, if something is off just a little bit, it’ll wreck the whole project.”
Banner Creations
bannercreations.com
Advertisement


 VEHICLE WRAPS + GRAPHICS3 weeks ago
 Press Releases3 weeks ago
 Case Studies3 weeks ago
 Case Studies1 week ago
 Benchmarks3 weeks ago
 Press Releases2 months ago
 Press Releases3 weeks ago
 Press Releases2 months ago