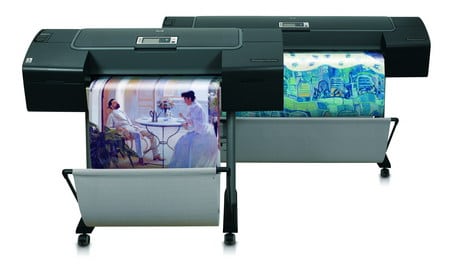
The world’s population of high-quality, wide-format inkjet printers priced at less than $10,000 has increased dramatically in recent years. One company that’s been busy developing new products in this segment is Hewlett-Packard. In 2006, HP announced the Designjet Z2100 (the 24-in. version) and the Designjet Z3100 (44-in.), and both are now shipping. The company has been marketing the printers to designers and photographers, as well as to its traditional large-format customer base (ad agencies, sign shops, and other print-for-pay firms).
Here, I’ll highlight some of the features of the Z3100 that I believe are of greatest importance to printmakers. I also recommend visiting HP’s website for additional specs and info. There, you can also find information about the HP Designjet Z2100, an 8-color printer with many of the same features as the Z3100.
Out of the box
The Designjet Z3100 is not a lightweight piece of equipment. The 44-in. model’s shipping weight with the palette is 271 lb and, after unpacking, the printer and stand weigh in at 189 lb. Even at that weight, it was surprisingly easy to unpack and assemble-with the help of a few friends. The box was very well packed and the set-up poster was easy to follow; it guided us step-by-step through the entire process with large, clear illustrations. The manual was also nicely produced and easy to read. It took about an hour and a half from the time we opened the box to the time we were ready to make the first calibration print. The print catch basket was especially painless to install, and it easily moves in and out of position as needed.
The dozen 130-ml cartridges and six printhead packages (two printheads are housed in each package) were easy to install, though I recommend working slowly just to make sure that the printheads are properly cleaned and seated. I installed the driver and utility software for Mac OS X and Windows XP, and a few weeks later upgraded both drivers, as well as the printer’s firmware. Since upgrading the firmware, I’m noticing better tonal separation when using the “print in grayscale” driver setting, especially on matte papers. I highly recommend restarting the printer and your computer after any updates like these. New calibrations and profiles for non-HP media will generally also need to be performed after a firmware update.
I installed both the Mac and Windows drivers, and both have performed very well. Workflow is no different than many other inkjet printers, although there is one difference with the HP system: Paper profiles are stored on a 40-GB hard drive inside the printer, which means that you can have the profile conversion done by the printer and still get very accurate results. For example, in Photoshop’s File>Print with Preview screen, you would choose “Let Printer Manage Colors.” You can also have Photoshop or other programs do the conversion at the application level (for example, “Let Photoshop Manage Colors”) and the print driver will automatically switch to “Application Managed Color,” which is a nice feature that helps avoid potential “double color management.”
The Windows XP system that I’ve been using is connected over Ethernet. Many of the printer’s options and features can also be controlled via a Web interface, by just entering the IP address displayed on the printer’s front panel into a Web browser from any printer on the network.
Advertisement
Overall, the printer looks very high-tech and it’s very well constructed. The main top cover is made of smoke plastic, allowing you to see what’s happening inside, which is reassuring. Like anything made of this material, it attracts dust and is easily scratched, so I’d recommend an acrylic cleaning product and a soft rag or paper towel to help keep it protected.
I have been testing the Mac OS X driver using a PowerBook G4 attached via USB to the printer. A few times over a 3- to 4-week period, I had to restart the printer when connected via USB, but since the firmware update, it has been running very smoothly. I now realize that one of the issues was due to the fact that under File>Page Setup, in order to have the Z3100’s driver allow sheets to be loaded, a specific page size made for sheets had to be selected. Otherwise, the driver may only display “roll” as a paper option in the print driver.
Spectro on board
At the heart of the HP Designjet Z3100 is the printer’s embedded spectrophotometer, mounted on the carriage. It uses i1 Color Technology from X-Rite and works extremely well. This system makes it possible to calibrate and make profiles for HP as well as non-HP branded papers.
Within about 25 minutes, any paper can be calibrated and profiled. Through an on-screen Wizard, the system optimizes the placement of and prints a calibration target with 64 patches on roll media or sheets as small as A4 (8.3 x 11.7 in.). It then optimizes the placement of and prints a profiling target with about 465 profiling patches on roll media or sheets as small as A3 (11.7 x 16.5 in.).
The spectrophotometer uses a UV cut filter that helps to produce more accurate results when measuring papers containing optical brighteners. At virtually any time, the 64-patch calibration target can be printed and automatically measured on the Z3100. For example, a new calibration should always be done after an ink cartridge or printhead change, however, the larger profiling target does not have to be reprinted. The calibration procedure brings the printer to virtually the identical state as the printers in HP’s labs when the HP media profiles were created. This should help make the HP-created profiles very accurate, and on the four HP-branded papers I’ve tested to date, I was very impressed by the color accuracy and neutrality of the gray ramps of the matching HP profiles. This is important because users operate printers in many different climates-from deserts to rain forests-and the calibration procedure should help machines print more consistently, whether people use custom- or vendor-built profiles.
HP Easy Printer Care (Windows) and the HP Printer Utility (Mac OS X) come with the Z3100, and both have the tools necessary for system maintenance and color management. Virtually any media from any manufacturer can be loaded, calibrated, and profiled. After calibrating and profiling, you can save the profile to the printer, and it will then appear in the “Custom Paper” section on the front panel. You can also export out the profiles to your computer’s profiles folder so that you can use them in Photoshop or other programs for soft proofing or for converting to the profile as described in the “Out of the Box” section. Profiles created with other hardware, or by other Z3100 users can also be copied to the printer’s internal hard drive.
Advertisement
After going through the calibration and profiling procedure with three different papers and a canvas, I made prints on all the media and found the color to be very accurate, particularly the neutral grays. Sharpness and detail were also excellent. The software asks you to choose a media type similar to yours so that the ink is applied in an appropriate way.
You also have the ability to choose the media drying time and whether or not the printer should cut the media after printing. The cutter works very well on matte and gloss papers, though I’ve only done about 150 cuts thus far with paper as thick as 265 gsm.
Although I’ve not tested it yet, a more full-featured calibration and profiling option, called the HP Advanced Profiling Solution, is available for about $1000. The hardware/software bundle, developed with GretagMacbeth (now X-Rite), includes a monitor calibrator as well as special software that allows targets with more patches to be output and scanned with the on-board spectrophotometer. In addition, the software allows profile editing and CMYK output profiling.
Also of interest is that HP and Adobe have developed the Adobe Photoshop Lightroom Calibrate Printer button. This Windows and Mac OS X-compatible option enables you to launch the Z2100 or Z3100’s color-management tools directly from the Lightroom Print module. And while we’re talking about Adobe Photoshop, there is also a Photoshop Print plug-in for the Z3100 (though it wasn’t available at press time), designed to make it easy to print directly out of Photoshop CS2 (probably CS3 as well). I’ve used the plug-in for the HP Photosmart Pro B9180 printer and it’s a joy to use because it bypasses the traditional driver by placing everything in one well-designed screen.
Care and feeding
The maximum sheet thickness that can be fed through the back feed slot is 500 gsm. It’s also important to note that the printer will need some space behind it to allow for roll and sheet loading. Two people standing on either side of the machine, however, can load, feed, and change rolls with the printer almost touching the wall. Sheet loading (especially with large and heavy sheets) will require space behind the printer because of the way in which sheets extend back from the printer while loading-something I learned the hard way when a sheet smacked into the wall about a foot behind the printer. The wheels on the stand are very well-made, so if the printer must be stored up against a wall, the printer can be carefully moved when necessary.
And on the subject of feeding paper: The printer will determine if your sheet or roll is skewed soon after it feeds the paper. If it is skewed, the printer will then ask you to lift the lever on the left of your printer to straighten the paper. My rate of success when loading new sheets or rolls has thus far been about 60%, and it only takes a few seconds to fix the skew.
Advertisement
‘Enhanced’ print quality
The print quality of the Designjet Z3100 is excellent. Gradients were smooth, and skin tones and saturated colors reproduced beautifully on all the papers and canvas I tested. The deep shadows, tonal separation, and highlight detail are truly impressive, especially on matte papers. The gamut maps I’ve seen from multiple sources show a very wide range of color, probably due to the range of different color pigments being used in the inkset.
The Z3100 handles this particularly well thanks to its four separate on-board black inks and a dedicated driver option that, when enabled, prints with only the black inks. Three of the black inks are used when printing on gloss or semi-gloss papers, and all four are used when printing on matte substrates.
I found that when adjustments were made in the driver, the toning was generally more subtle in my prints, compared with the small box that shows the color toning in the driver window. Also, if any color toning is done in the driver, color ink will be added to your print. If you want a print that contains just black ink, not a mix of black and color inks, it’s important to not make any adjustments in the area of the driver that contains the color wheels for toning monochrome images.
With the Gloss Enhancer enabled, color and black-and-white images on gloss or semi-gloss paper look super-smooth, and in my opinion, take on a “made in the darkroom” look. The Gloss Enhancer also reduces “bronzing” on many papers (bronzing is an effect that makes the tones in semi-gloss and gloss papers appear bronze in color when viewed at various angles). Also of great importance: I noticed only a slight visual shift in image color when I moved prints from the Z3100 between different light sources-for example, between natural daylight and indoor tungsten.
The Gloss Enhancer can be applied through the print driver either to just the areas that have tone in them (called Econo mode), or to the entire page (called Whole Page). Roll-fed paper can be printed full-bleed, but sheets cannot; so if you choose “Whole Page,” a thin margin will appear around the edges of sheet-fed prints. Also, keep in mind that if you select your profiles under Photoshop’s Print with Preview menu and “Let Photoshop Determine Colors,” virtually all the gloss and semi-gloss papers will have separate Gloss Enhance ON (GE ON) and Gloss Enhance OFF (GE OFF) profiles. These profile sets are also created automatically when you create your own profiles using the internal software and built-in spectrophotometer.
Media alert
In my opinion, one of the most exciting parts of inkjet printing is experimenting with different media. HP has more than 60 different media options that have been tested with the Z-series inkset. Two HP-branded papers that I’ve been very happy with are HP Hahnemuhle Smooth Fine Art Paper (a slightly textured, watercolor-based art paper) and HP Premium Instant-dry Satin Photo Paper (a very smooth, heavyweight semi-gloss paper). I also really like the look and feel of HP’s Artist Matte Canvas, especially after coating it with a water-based semi-gloss varnish and stretching it onto stretcher bars.
Another paper that stands out for photo output is Oriental Graphica’s FB Glossy Photo Paper. This is a super-high gloss, heavyweight paper that has a fiber-base. After printing on the Z3100 with the Gloss Enhancer, the paper has a super smooth, mirror-like finish. Two other papers with fiber bases and an absolutely beautiful, fine-art feel are PremierArt’s Platinum Rag and Hahnemuhle’s Fine Art Pearl. My focus has been on fine art and high-end commercial portfolio output, but there are obviously many other substrate choices from HP and other companies.
To really “test the waters,” I had a friend run some hot tap water over prints made on HP Hahnemuhle Smooth Fine Art Paper and Hahnemuhle’s Fine Art Pearl. Even after soaking both sides for about 30 seconds, neither one ran and both looked the same as before being soaked, except that the paper bases appeared less even after they dried out. One important thing to note: On the Fine Art Pearl paper, I was able to scratch and damage the wet print surface with a dry and abrasive paper towel after soaking the print with water, but an area of the print that was covered by HP’s Gloss Enhancer stayed completely protected from the effect of the scratching.
Speed, longevity, RIPs, and more
Print speed can have significant impact on a company’s productivity (and bottom line). On many printers, however, the fastest modes are generally unusable for anything but very low-end printing. That is definitely not the case with the Z3100.
I was stunned at the quality of images that came out using the “Fast” media setting in the HP driver. This mode (the fastest offered under the “Custom” Quality Options) may produce slightly lower density or less detail in certain areas, but it is worth testing for some applications that don’t require the highest quality because the speed increase is significant over other modes.
To give a real-world example, a 30 x 36-in. print took about 9 minutes to print in Fast mode and about 13 minutes using Fast mode with “Maximum Detail” checked. One negative with the Fast setting is that the Gloss Enhancer option cannot be used. The Normal mode with Max Detail off, however, took just 12 minutes to print the same 30 x 36-in. print, and Normal mode does allow for Gloss Enhancer to be enabled. In comparison, the same print took about 20 minutes to print in the Best mode with “Maximum Detail” off, and about 30 minutes with “Maximum Detail” on.
Also of note:
* Prints that last: Photographers, artists, and those who produce outdoor graphics require prints that will not fade or change color quickly. Of course, everyone defines “quickly” a little differently. The 8-color set of Vivera pigment inks used in the HP Designjet Z2100 (similar to the Designjet Z3100’s inkset) have been rated in combination with a variety of media to have an expected display life of more than 200 years behind glass before noticeable fading.
* RIPs o’plenty: Many RIP manufacturers are producing RIPs for the Designjet Z3100 to help clients better handle image nesting, CMYK workflows, and other issues. As of this writing, many RIPs were still in development.
* Cleaning: I have not had to do even one cleaning cycle since installing the printer over a month ago. That’s due primarily to a procedure that the printer performs on a timed basis or at other intervals. According to HP, the tests use only a negligible amount of ink, and to optimize its effectiveness, it is important to leave the printer on at all times.
Wish list
Two wish-list items I have for the printer: I would like to be able to load cut media from the front of the machine by lining it up with the blue lines from the very beginning of the process. This would save time by reducing the percentage of “paper skew” errors and would avoid the need to feed paper from the back when you have heavy sheets. Second, I’d like to customize the printer’s internal beep much like a customized ringtone (the current beep is used to signal when a paper needs to be selected, or if there is an error).
I would recommend the HP Designjet Z3100 printer to anyone who wants a well-built large-format inkjet printer with excellent ink longevity, a great black-and-white printing engine, and an elegant, simple, yet powerful built-in calibration and profiling system.
Price: $4095 (24 in.) and $6295 (44 in.).
Hewlett-Packard
www.hp.com
Andrew Darlow is a photographer and digital imaging consultant based in the New York City area. He is editor of The Imaging Buffet (http://www.imagingbuffet.com an online magazine and podcast with news, reviews, and interviews on the subjects of digital photography, printing, and imaging. His new book, 301 Inkjet Tips and Techniques (published by Thomson/Course Technology), covers a wide range of printing topics.


 VEHICLE WRAPS + GRAPHICS3 weeks ago
 Press Releases3 weeks ago
 Case Studies3 weeks ago
 Case Studies1 week ago
 Benchmarks3 weeks ago
 Press Releases2 months ago
 Press Releases3 weeks ago
 Press Releases2 months ago