As part of a rebranding project, Red Robin restaurants enlisted bluemedia and its sister company Blind Society to come up with some ideas to complement their existing décor. The restaurants have a well-established Americana motif, featuring prints and items from pop-culture over the years (not to mention endless French fries), and the challenge was to stay within their current theme, but find some unique ways to implement the graphics so they’d stand out among the traditional wall prints.
Our shop has a long history of executing two-dimensional graphics for our clients such as murals and banners, but this project provided us with the opportunity to work outside our normal offerings – and consider not just the graphics on an item, but how the item itself needed to be constructed.
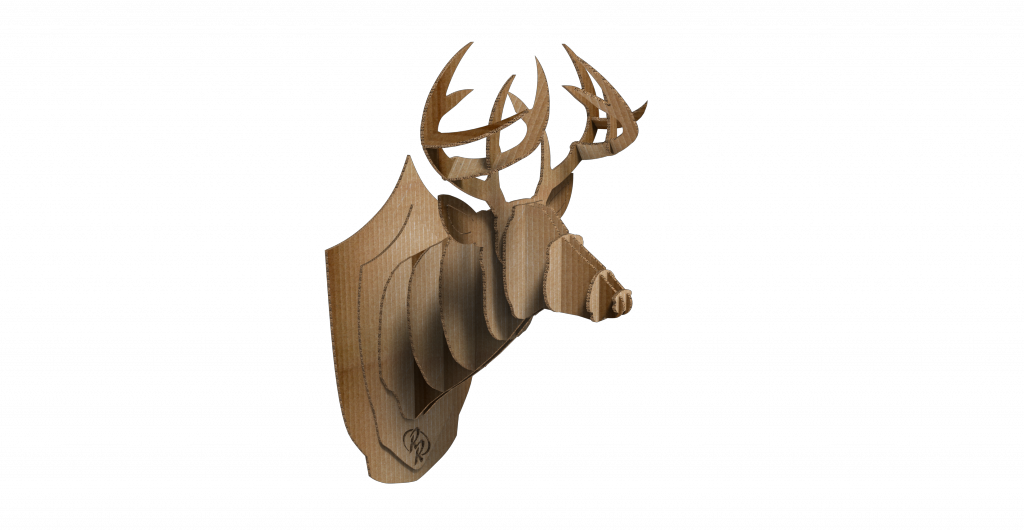
We proposed a number of ideas to Red Robin, combining our traditional print work with custom elements. Among the proposals: a trophy-style deer’s head made to look like it was built from standard road and street signs.
STEP 1
Investigating Materials
During the concept phase, we presented multiple options to the client, and once they approved the “street sign” version of the deer head, we then had to choose a material that would not only give the desired appearance, but would also hold up during assembly. Picking the correct material would set the foundation for the entire project.
Our initial idea was an aluminum composite to give an authentic street-sign look, but we tested a variety of materials – ranging from 3A Composites’ 3mm Dibond to Sintra PVC, cardboard, wood, and other substrates. The final material had to let the pieces slide together easily without deforming, and rigidly hold the assembled form. In the end, we chose Sintra as the right solution here.
STEP 2
Designing a ‘No-Tools’ System
Being able to efficiently store and ship the deer heads was a concern. Keeping the pieces unassembled until they arrived at the installation site would reduce the package size for a kit, and would also allow us to better protect the graphics.
Advertisement
Our goal was to produce a finished piece that could be easily put together with no adhesives and a minimum of tools – because the interior signage at any given store could be installed from anyone from Red Robin staff to installers who were executing more complex work. We decided on a set of matching slots, so joining pieces could slide together and stay in place permanently. To anchor the neck pieces into the base, we would include a set of slots and pieces that “locked” in place, allowing the whole thing to be assembled without tools. The only additional hardware needed: a bracket and a few screws to mount it to the wall.
STEP 3
Testing the Geometry
Having decided upon material and method, we then had to figure out the exact shapes to cut so that everything would nest together correctly. Upon its assembly, we wanted the edges of all the pieces to be flush with each other, and we had to ensure the tabs on the deer’s neck would fit through the spaces that were cut in the base for them.
Because we would use a round router bit on our Zünd G3 to cut the pieces – we couldn’t create a 90-degree “inside” corner – the cut paths had to be offset to account for the rounded ends of the slots. We had to consider the width of the 6mm and 13mm Sintra being used for various pieces, as well as the radius of the router bit. We then created multiple test pieces to ensure we had everything just right before moving on to the real thing.
STEP 4
3D Modeling for the Real World
Once we had finalized just how the printed deer heads would be constructed, it was time to go back to our conceptual models and adjust them to work in the real world. We executed the initial design using McNeel’s Rhino 5 3D modeling software, disassembling the model into its individual components. In addition, we added in the slots and tabs at this stage to make it all fit together.
STEP 5
Sign, Sign, Everywhere a Sign
The shapes were then imported into Adobe Illustrator to prepare them for production. The information from the 3D model was converted to cut-path information for the Zünd, and the pieces were arranged to fit as efficiently as possible onto 4 x 8-foot sheets of Sintra. With the page layout set, images of street signs (most sourced from stock imagery) were overlaid and we created a print-ready PDF.
At the same time, we created two additional PDFs – one as a proof for our production department, and another PDF with assembly instructions that would be shipped with the kits. Normally, we would have the client sign off on a final proof at this point, but since this was such a unique project we created an actual prototype for them to approve.
Advertisement
STEP 6
Taking Advantage of Direct Print
We were now ready for production. Our design department sent the PDFs to our Onyx Thrive RIP, which added registration marks and sent print files to our EFI Vutek PressVu 200/600 SC flatbed, with matching cut files to the Zünd. We have faster printers in-house that are capable of printing to vinyl, but by printing the graphics directly onto the Sintra, we were able to get a more durable product – plus, the time saved by not having to laminate and apply the vinyl makes up for much of the time when producing something like this in bulk.
STEP 7
Finishing: The First Cut is the Deepest
After printing, we had sets of two sheets of graphics on Sintra: a 6mm sheet for the deer pieces, and a 13mm sheet for the base components, both ready to go to the Zünd for cutting. There are multiple router-bit options for cutting Sintra, but we had to be sure to pick the same one we used to determine our shapes (see Step 3), so that everything fit as planned.
STEP 8
Assembly, Install, and Video
The pieces to one set were packaged (kitted) with the set of PDF instructions and readied for shipping. According to our stopwatch, one person can assemble the kit in about 10 minutes, and we routed out guide holes in the base to show where to attach the z-clips for mounting to the wall. Along the way, however, we learned that the assembly would be easier if the pieces were held a certain way, so we recorded a video of one sign being assembled in our shop and posted it online to give installers in the field every resource possible to easily get the job done.
So far, we’ve produced two completed deer heads to Red Robin, and they’ve added these to two of their remodeled stores. Our involvement is projected over the next couple of years – the restaurant chain has about 460 units, and they could all end up with one of these (although full coverage isn’t guaranteed).
Equipment and Supplies Used
Hardware & Software: EFI Vutek PressVu 200/600 SC printer, Zünd G3 digital cutting system, Adobe Illustrator, McNeel Rhino 5 modeling software, Onyx Thrive RIP
Materials: Sintra PVC, z-clips
Tools and miscellaneous: Screwdriver, screws
Shane Furey is operations manager for bluemedia (bluemedia.com) in Tempe, Arizona.
Advertisement


 Best of Wide Format2 months ago
 Columns2 months ago
 Best of Wide Format2 months ago
 Best of Wide Format2 months ago
 Best of Wide Format2 months ago
 Best of Wide Format2 months ago
 Best of Wide Format2 months ago