Event Signage
Behind the Scenes with Justin Pate: Walls, Windows, and Floors
Live tips from the Wrap Institute founder.
Wrap expert Justin Pate led a two-day workshop at Cincinnati’s own Vivid Wraps in February. Co-hosted by Avery Dennison and Mutoh, the workshop is part of a nationwide series for PSPs, wrap installers, car detailers, and more. Read about Justin Pate's tips from the same workshop about wrapping vehicles here.
“I want to teach you how to wrap smart,” Pate began. This includes a solid understanding of the materials. He also introduced the mantra that would come up again and again over the next few days: “As soon as you think ‘Fly. Go fast,’ you’re going to make mistakes. Thank god airlines don’t do that. Pilots take their time and do it right.”

Pate began the course by going over each tool that would be used.
He snuck in a number of skipped steps to demonstrate his point as he installed window, wall, and floor graphics right at the Vivid Wraps facility. All graphics were printed on a Mutoh ValueJet 1624X.
Windows
“’Maybe,’ ‘perhaps,’ and ‘probably’ are not words you want to use when wrapping,” Pate said as he wiped the window clean. “Essentially, you are half installer, half window washer.” The demo graphics were printed on Avery Dennison MPI 2921 with DOL 1360Z gloss overlaminate.
Tips included:
Advertisement • 90 percent of window graphics that fail do so because either the surface wasn’t clean or the installer cut it to the silicone edge of the window. Silicone repels adhesive, so installers want to keep a gap the width of the squeegee between the edge of the vinyl and the silicone trim.
• Use a spray bottle with a few drops of soap in water and spray continually to keep the adhesive from drying until you’re ready for it to do so.
• When trimming the vinyl, keep your blade at a 10-degree angle to keep from cutting the glass. When you get near the edge, switch directions to maintain the angle.
• Start squeegeeing from the middle outwards so the vinyl doesn’t “slump” and go crooked as you go.
• “Kill fees. It’s just business.” Installers should be sure to add cancellation fees to their contracts. “If you cancel your hotel or your flight, do you get your money back?”
• “Skipping steps goes south really quick,” Pate reminded the group after tearing a hole in the vinyl as he squeegeed. The tool had been tossed around in his bag and was rife with rough edges.
Walls
The demo graphics were printed on Avery Dennison MPI 2631 Pure Canvas Wall Film with removable adhesive. Tips included:
 • Always test, and never offer a paint guarantee. “When you wrap cars, the paint is guaranteed because the surface is controlled in a factory setting. Walls, not so much.”
• When walls are painted, dirt often gets into the paint. Installers call this “snot,” and you’ll want to be sure to remove it with a plastic scraper before you wrap.
• Use alcohol to clean rather than soap and water – it dries faster. “I’m all about minutes,” Pate said.
• Recommend that clients laminate wall graphics in high traffic, high bump areas to avoid scratches. “If the client decides not to laminate to save some money, that’s fine with me. They’ll be calling me back in a month to redo it,” Pate said.
• Hang the panel with the most text first. The overlap order doesn’t matter, but you’ll want to make sure the bulk of the text is level before registering the next panel.
• Use tape to give yourself guiding points in case the graphic falls while you’re positioning it.
• Use a scrap of material to check the stability of the molding before you trim against it.
• Leave the butt joint because calendered material will shrink up to one percent.
• Run your heat gun over the overlap when installing textured films.

Pate demonstrated how to wrap around a light switch after a request from a class attendee.
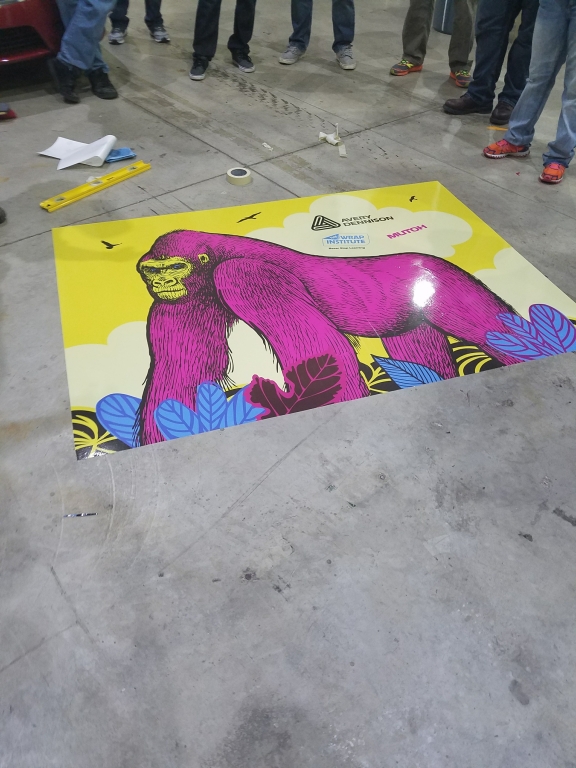
Floors
Demo graphics were printed on Avery Dennison MPI 2921 with DOL 1360Z gloss overlaminate. Tips included:
• “Floors are totally underwrapped,” Pate said. “It’s easier than a wall, but people don’t think about it.”
• You must use an anti-slip laminate.
• Durante chimed in, saying he used a floor graphic to decorate a recent tradeshow booth. The graphic cost $400; renting carpet would’ve cost $800.
• Clean much wider than the edge of the graphic so your squeegee doesn’t pick up dirt if you go beyond the edges.
• You don’t have the option to register as you go with floor graphics. You must line it up before taking off the liner. Ask designers to give you some flexibility in the design so it doesn’t have to register pixel to pixel. (This advice is great for any application.)
• Don’t crawl on the graphic.
• Don’t squeegee toward yourself.
• You have to charge different prices for different things. It took your production crew more time to trim the floor graphics in advance, whereas with window graphics, trimming was part of the installation. “Charge for it. It’s business.”
• When installing over a gap in the floor, don’t cut the graphic, for two reasons: 1. It’s one less place for dirt to get under when the floor is swept or mopped. 2. The material in the gap is probably silicone, so the vinyl won’t stick to it.
• Indoors, you do have to cut the overlap when installing multiple panels, for safety reasons. (Outdoors, you have to leave it because the material will shrink.)

Pate removes the overlap from this indoor floor graphic.
Read Justin Pate's tips for vehicle wrapping and follow @BigPicturemag on Twitter for live updates from events all over the globe.
AdvertisementPrintvinyl Scored Print Media
New Printvinyl Scored wide-format print media features an easy-to-remove scored liner for creating decals, product stickers, packaging labels, and more. The precision-scored liner, with a 1.25” spacing on a 60” roll, guarantees a seamless and hassle-free removal process.


Konica Minolta Appoints Frank Mallozzi to President, IPP

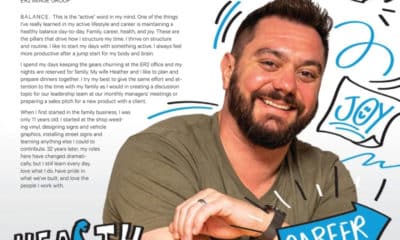
This Wide-Format Pro Started at Age 11, and 32 Years Later, Still Loves What He’s Doing

Wide-Format Printers Share Their Thoughts on Business-Advice Books


Bulletins
Get the most important news and business ideas from Big Picture magazine's news bulletin.


-
 Best of Wide Format1 month ago
Here Are the Winners of the 2024 Best of Wide Format Awards
-
 Columns2 months ago
How Apps and Instruments Are Making Color Mobile
-
 Best of Wide Format1 month ago
Graphics Turn an Eyesore Cooler Into a Showpiece Promo in Historic Plaza
-

 Best of Wide Format1 month ago
Private Customer’s Bespoke Bathroom Wallcovering Showcases Their Passions
-
 Best of Wide Format1 month ago
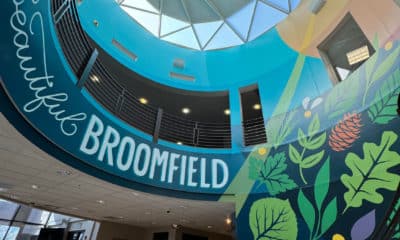
Colorado Town Hypes Its Incredible Natural Gifts in City Hall Rotunda Project
-
 Best of Wide Format1 month ago
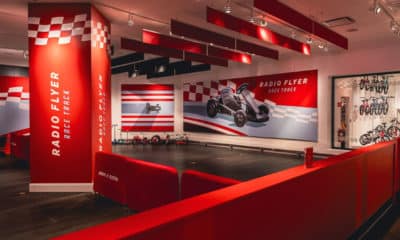
Illinois Print Pros Help Historic Toy Brand Create a Memorable Shopping Environment
-
 Blue Print6 days ago
This Wide-Format Pro Started at Age 11, and 32 Years Later, Still Loves What He’s Doing
-

 Best of Wide Format1 month ago
Iconic Music Venue Celebrates Half-Century With Vibrant Exhibit of Rock Artifacts